Setting up a Blog using Jekyll - Part1
Hello All!
I recently moved my blog from WordPress to GitHub Pages. I thought it would be difficult shifting everything from one place to another. But everything happened in 1 single day. It was really easy to do it.
So, I would like to share what I did to migrate the complete site from WordPress to GitHub Pages.
The complete content has been divided into 2 posts. In the first post, I will be discussing how to create a website using Jekyll from creating a GitHub Repository till a working website. Along with that, I will also share the things I did while migrating from WordPress to GitHub Pages.
No blog is complete without the comments section. So, in the second post, I will write how I used disqus to power my blog with the comments section.
With content and comments, your blog is good to go!
Let us get started!
Pre-requisites :
- You will need a GitHub Account - to use GitHub Pages.
- How to use git, the famous Version Control System.
Step1: Creating a repository in your GitHub Account.
In case you do not have a GitHub account, it is very easy to create one. Go to github.com , press the Sign up button and create one.
-
First step is to create a new Repository with name < username >.github.io . For example, my GitHub Username is adwait1-g. So, I created a repository with the name adwait1-g.github.io. The repository name must be of the form < username >.github.io and nothing else. If it is something else, your website won’t work.
-
Once you have created a repository, click on the Clone or download Button and copy the link present there. For my repository, the link is “https://github.com/adwait1-G/adwait1-g.github.io.git”, you will have something similar.
-
Fire up your terminal and execute the following command.
$ git clone https://github.com/username/username.github.io.git- Don’t forget to replace username with your actual GitHub username.
- What you did there is, you downloaded a copy of your online repository onto your local machine. clone means duplicate or create one more of the same kind. So, you have the same repository on your local machine.
- The repository will be a directory with name username.github.io.
-
Enter the directory username.github.io with this command.
$ cd username.github.io- This is probably empty or will have a README.md file.
At this point, Step1 is done.
Step2: Using Jekyll to generate a sample website.
All the code, your content, everything required to make your website come alive will be stored in this Repository. So, make sure you are inside this directory for this step.
Jekyll is a static website generator. In simple words, you write your posts in Markdown and Jekyll will take everything and give a proper website. It does not have any backend database. Everything are simply markdown files. For complete details, look at the Jekyll website
-
Installing Jekyll.
-
Jekyll is a Ruby Framework. So, you will need the Ruby interpreter to run it. This is how you install Ruby.
$ sudo apt-get install ruby -
Then execute these 2 commands:
$ gem install bundler jekyll -
With that, you have jekyll installed on your machine.
-
-
Let us build a sample website using jekyll. Run the following command.
username.github.io$ jekyll new .- The above command will generate all files required to run a simple website and store it in your directory.
- The general command is jekyll new < website_name > . So, Jekyll creates a directory with name website_name and lays down all the files in that directory.
- In our case, we already are inside the directory, so we used . instead of website_name. The .(dot) means current directory.
-
You will get an output like this:
      username.github.io$ jekyll new .
      Running bundle install in /username.github.io...  Bundler: The dependency tzinfo-data (>= 0) will be unused by any of the platforms Bundler is installing for. Bundler is installing for ruby but the dependency is only for x86-mingw32, x86-mswin32, x64-mingw32, java. To add those platforms to the bundle, run `bundle lock --add-platform x86-mingw32 x86-mswin32 x64-mingw32 java`.
      Bundler: Fetching gem metadata from https://rubygems.org/...........
      Bundler: Fetching gem metadata from https://rubygems.org/.
      Bundler: Resolving dependencies...
      Bundler: Using public_suffix 3.0.3
      Bundler: Using addressable 2.5.2
      Bundler: Using bundler 1.16.3  Bundler: Using colorator 1.1.0
      Bundler: Using concurrent-ruby 1.1.3  Bundler: Using eventmachine 1.2.7
      Bundler: Using http_parser.rb 0.6.0
      Bundler: Using em-websocket 0.5.1
      Bundler: Using ffi 1.9.25
      Bundler: Using forwardable-extended 2.6.0
      Bundler: Using i18n 0.9.5
      Bundler: Using rb-fsevent 0.10.3
      Bundler: Using rb-inotify 0.9.10
      Bundler: Using sass-listen 4.0.0
      Bundler: Using sass 3.7.2
      Bundler: Using jekyll-sass-converter 1.5.2
      Bundler: Using ruby_dep 1.5.0
      Bundler: Using listen 3.1.5
      Bundler: Using jekyll-watch 2.1.2
      Bundler: Using kramdown 1.17.0
      Bundler: Using liquid 4.0.1
      Bundler: Using mercenary 0.3.6
      Bundler: Using pathutil 0.16.2
      Bundler: Using rouge 3.3.0
      Bundler: Using safe_yaml 1.0.4
      Bundler: Using jekyll 3.8.5
      Bundler: Using jekyll-feed 0.11.0
      Bundler: Using jekyll-seo-tag 2.5.0
      Bundler: Using minima 2.5.0
      Bundler: Bundle complete! 4 Gemfile dependencies, 29 gems now installed.
      Bundler: Use `bundle info [gemname]` to see where a bundled gem is installed.
      New jekyll site installed in /username.github.io.
      /username.github.io$
-
Let us run the Jekyll server and look at our sample website.
username.github.io$ jekyll serve-
This is the kind of output you would get.
username.github.io$ jekyll serve Configuration file: /username.github.io/_config.yml Source: /username.github.io Destination: /username.github.io/_site Incremental build: disabled. Enable with –incremental Generating… Jekyll Feed: Generating feed for posts done in 0.34 seconds. Auto-regeneration: enabled for ‘/username.github.io’ Server address: http://127.0.0.1:4000/ Server running… press ctrl-c to stop.
-
Note the Server address. Copy that Server Address.
-
-
Open up your browser and paste that Server Address and Enter. You should be able to see an output like this:
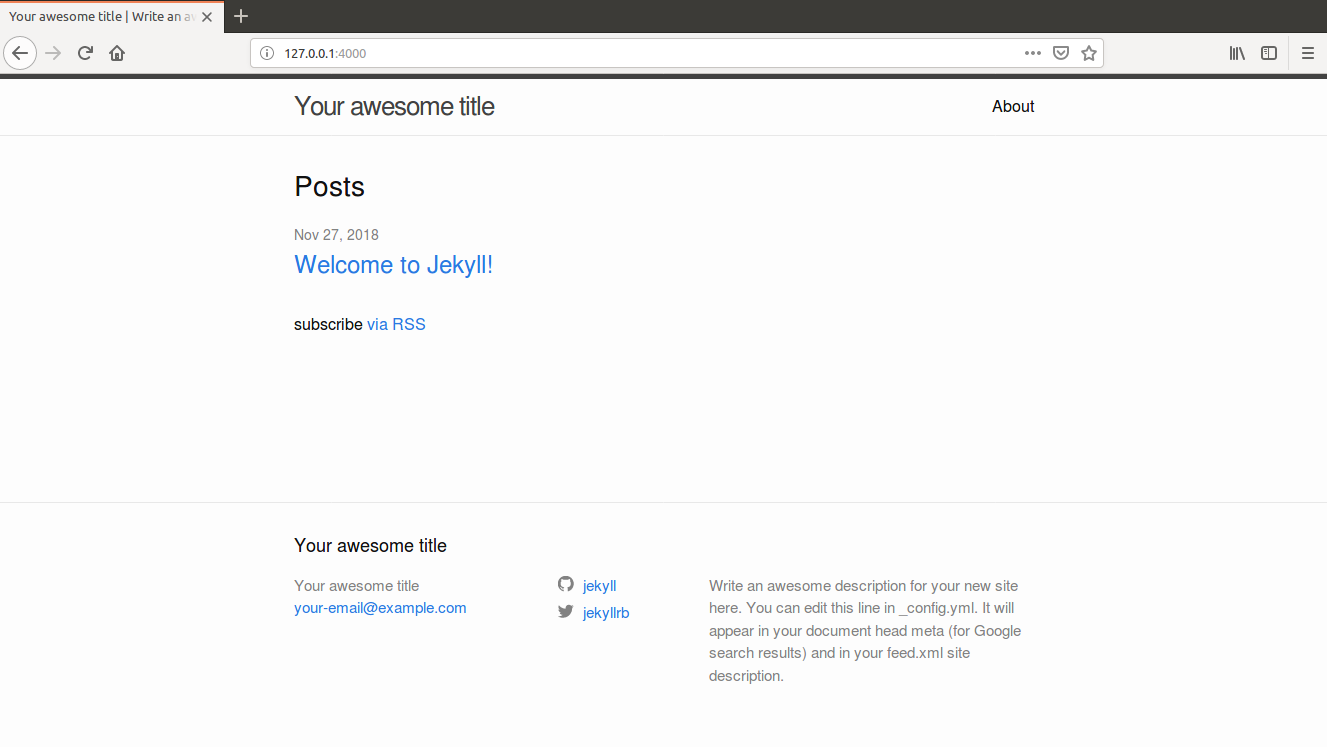
-
With this, you have a working website running!
From here, it will be changing this Website the way we want and get our blog ready.
Step3: Understanding the structure of the website
It would be helpful if we understand the bunch of files generated by Jekyll because it will help us to modify the required files / directories to convert the sample website into the site we want.
-
This is what the username.github.io directory has.
username.github.io$ ls 404.html about.md _config.yml Gemfile Gemfile.lock index.md _posts _site- The _config.yml has details about your website. It has title, email, github_username etc.,
- The 404.html page is the webpage that gets displayed when someone asks for something which is not present in your site.
- The index.md is the home page of your website.
- Look at the sample website again. There is a About hyperlink which will lead you to a webpage. That webpage is designed in about.md. This is just the sample. If you look at my website, it has other things like Categories, About Me etc., We can have the options we want.
- The Gemfile has a list of all gems being used by your website. A gem is a Library written in Ruby which can directly be used.
- You can place your blog articles in the _posts directory. Every article should be written in Markdown. Jekyll will generate the corresponding html files.
-
Finally the _site. This is actually the website. Look at what it has.
username.github.io/_site$ ls 404.html about assets feed.xml index.html jekyll - The _site directory has all the corresponding html files of the markdown files we saw.
This is the File Structure of a Jekyll Sample website.
Step4: Convert the sample website into your website
In this step, you will customize the site the way you want. There are so many things you can do. I will list and explain the things I did to get my blog running.
-
First thing I did is update the _config.yml file. Fill in the details there properly because they will get displayed in your website.
- title: The title of your website. Eg: My blog’s name is PWNTHEBOX!.
- email: Enter your Email Id. It will be displayed in every page of your website. Look at the bottom of my website. You will find my Email Address.
- description: You can write anything here. Describe your website in a few words.
- github_username, twitter_username - You know it. You can also have a LinkedIn Username. Add it like this: linkedin_username:.
-
Add the required header pages.
-
The about.md is a header page. Similarly, you can have any number of Header pages you want. My site has 4 header pages at this point in time. I did not need the about.md. So, I removed it. I added 4 Header pages / Markdown files I needed. They are categories.md for Categories, awesome_resources.md for Awesome Resources!, about_me.md for About Me! and about_this_site.md for About This Site!. These are pages I needed. You can add pages you need.
-
Once you have placed the markdown files of required header files, execute jekyll serve and make sure you get the Header options.
-
In my site, the order of Header options is Categories, Awesome Resources!, About This Site! and About Me!. You can specify the order you want in the _config.yml file. Look at the following section of _config.yml of my site.
plugins: - jekyll-feed header_pages: - categories.md - awesome_resources.md - about_this_site.md - about_me.md- You add a heading called header_pages: in the _config.yml and specify your order.
-
After doing all this, verify the site by executing jekyll serve .
-
-
Adding the posts you want - Follow these simple rules and you are good to go.
-
Every post / article should be in the markdown format. If you do not know markdown format, do not worry at all. Look at this page. It has the basic syntax which is all you will need. If you need more, you can always google.
-
For people who are migrating from WordPress to GitHub Pages: The default text editor in WordPress is not a Markdown Editor. It is a normal Editor. So, in case you have all your blog posts in normal text format, then you will mostly have to rewrite it to markdown or find a way to convert it. I did not face this problem because I was really comfortable with writing posts using markdown, I had downloaded a Markdown Editor for WordPress. So, I had to literally copy-paste files from there to here.
-
In Jekyll, every post has a particular naming format. It goes like this:
yyyy-mm-dd-the-title-of-the-post.md- The Date is very important.
-
Inside the post, there is something called as Front Matter which is a must for any post. Look at the Front Matter of this post.
--- layout: post title: Setting up a Blog using Jekyll - Part1 categories: Blogging comments: true --- - Here, the layout: post is the most important thing. You cannot skip it. To know what happens if you skip it, skip it for a post, do jekyll serve and see.
- In the filename of the post itself, you would have added the name of the post. In case if you do not add the title: option here, Jekyll will extract the post title from the filename. I personally feel it is always better to add the title: option and be sure about the post title.
- Yes. You can add categories too. It depends on the post. This article which I am writing is about Blogging, so is the category. There are no standard categories. You can categorize the post the way you want.
- The comments option. For now, keep it as true. But nothing will happen - you will not have a comments section just because of this option being true. I will talk about comments in detail in the next post.
- Last but the most important, the — at the beginning and ending is a must. If that is not there, the website will not function properly.
-
Place the Markdown file in the _posts directory and execute jekyll serve. You will see that post’s link on your website’s homepage. Like this, you can write as many posts as you want.
At this point, you can pretty much design the whole website the way you want. I did not talk about the themes in Jekyll. The default theme is minima. I felt it is simple and beautiful, so I did not change it. If you want to change the theme, look at this page. It has clear cut instructions of how to do it.
Step5: Commiting changes and pushing the website code to your GitHub
You would have made a lot of changes like added a bunch of blog posts, added a few header pages you want, modified the _config.yml file etc., When you do jekyll serve, all these changes are see. If you want see the same in the browser when your site is hosted in the Internet, you have to push the code in the username.github.io directory to the online Repository of your GitHub account. Follow these steps and you will be done.
-
Add all your files to the staging area.
-
Remember how the username.github.io directory was at the beginning of this post. It was empty or maximum had a README.md file. But now, you have all files required to make the website running. So, add all these files into git’s staging area with the following command.
username.github.io$ git add . -
This command means, add all files in the present directory(.) to the staging area.
-
-
Commit the changes.
-
Once you added the files to the staging area, you have to commit those changes. This is how you do it.
username.github.io$ git commit -m "Your commit message" -
Your commit message can be anything. Just make sure it is meaningful and tells something about the changes you have done.
-
-
Push the code to your online repository.
-
You have made changes in your local directory and commited them. The only thing left is to push those files to your online repository where all the magic happens. Execute the following command.
username.github.io$ git push origin master Username for 'https://github.com': username Password for 'https://username@github.com': -
Once this is done, your online repository is updated.
-
-
Give a few seconds. Open up the browser and enter the URL: username.github.io. You should be able to see your site!!
A hearty congratulations on this. You have your site ready and running!
Step6: Use a custom domain for your website(Optional Step)
This is an optional step. If you want to use a custom domain for your website instead of username.github.io, you may follow the following steps to get this done. What I mean by custom domain is, the actual URL of my website given by github is adwait1-g.github.io. But, I wanted www.pwnthebox.net to be the URL of my website.So, www.pwnthebox.net is the custom URL.
You will have to buy such a domain from a Domain markerplace like GoDaddy, AWS’s Route 53 or any such place.
Consider a domain mydomain.xyz. Suppose you want to keep your website URL as www.mydomain.xyz.
-
In the directory username.github.io, execute the following command.
username.github.io$ echo "www.mydomain.xyz" > CNAME- Here, you are creating a file with name CNAME and adding the desired URL in it.
- CNAME stands for Canonical Name. You will know what it means in the next step.
- Once this is done, add this to the staging area, commit changes and push it to your GitHub Repository.
-
Go to the place where you bought that domain and create a DNS Record which should look like the following.
www.mydomain.xyz CNAME username.github.io
After a few seconds, you can see the change. You can type in the URL www.mydomain.xyz and you will see your website.
Step7: Enabling TLS in your website
You can test this. When the URL is username.github.io, your website has TLS - https. When you use your custom URL, it will just be http. To make the site https follow these steps.
-
Login to your GitHub account and choose the repository username.github.io.
-
Go to Settings. Look at this screenshot:

-
In the Settings, there a lot of options. As you scroll down, you will a section named as GitHub Pages. Look at this screenshot:
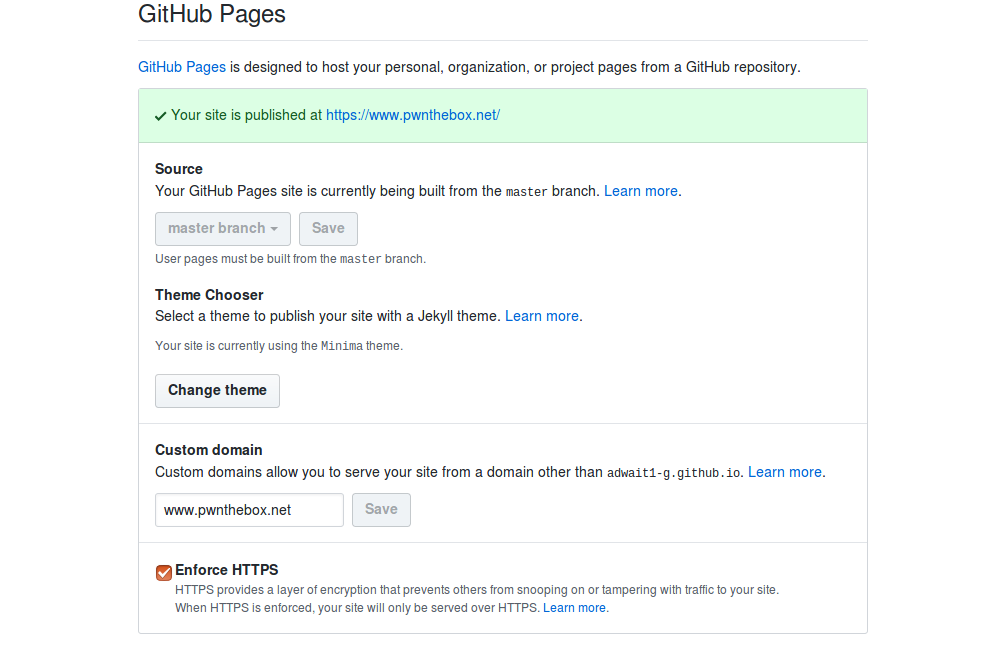
- Look at that option Enforce HTTPS. Click on that box and make sure Enforce HTTPS is true - that box should have a tick mark.
Once the last step is done, your website is always TLS enabled.
There is just 2 last things I want to share with you.
-
Any post you write might have images, link to some files etc., So, you can store it this way:
-
In your root directory(username.github.io), create a directory of the name assets.
username.github.io$ mkdir assets -
This directory is where all the assets of a post like images, files etc., are stored. Suppose you wrote a post with name yyyy-mm-dd-title-of-the-post.md. Suppose you have a few images and files you want to use in that post. You can store those images, files etc., in the following way.
-
Inside the assets directory, create a directory with the same name as that of the post.
username.github.io/assets$ mkdir yyyy-mm-dd-title-of-the-post
-
Enter that directory and store all those images and files or anything related to that post.
-
-
You can use an image of name name_of_image.png in the post like this:
 -
If it a file with name name_of_file.xyz, you can do this:
[name_of_file.xyz](/assets/yyyy-mm-dd-title-of-the-post/name_of_file.xyz)
-
-
At any cost, do not store anything manually in the _site directory. This is because Jekyll generates the content in the _site directory using everything else in the username.github.io directory. As Jekyll generates it, anything you store will be removed from it. So, whatever you want to store, it should be stored outside the _site directory.
At this point, you will have a website running.
In the next post, We will see how we can make our website more effective by enabling comments section for each post using disqus.
At any point, if you get stuck at any step discussed above, feel free to look at my repository.
That is it for this post. I hope you were able to create a website using jekyll.
Thank you!